Tunnelling Remote Desktop
In case you’ve ever wanted to tunnel Windows XP’s Remote Desktop service over SSH, here’s how!
First up, you need to configure your SSH client to forward a local port to your remote connection’s machine. This is always a bit tricky, but it’s complicated by the fact that you may well be running the Remote Desktop Service on your client machine too! SSH tunnelling relies on tunnelling data from a local port to a remote port — usually you tunnel the data from your machine to the remote machine on the same port number. RDS uses port 3389, but if you tried to tunnel your local 3389 to the remote machine’s 3389 you’ll have issues when SSH tries to allocate port 3389 locally — your client’s RDS server will already be using it!
The solution is to tunnel an alternative port on your local machine to the remote machine’s port 3389 — I chose 13389 in my example; which should be fine in your case too. I’m assuming you’re using PuTTY, an open source SSH client, but the theory is solid for all SSH clients. Bring up the configuration options for your remote connection, and then go to the Connection->SSH->Tunnels page:
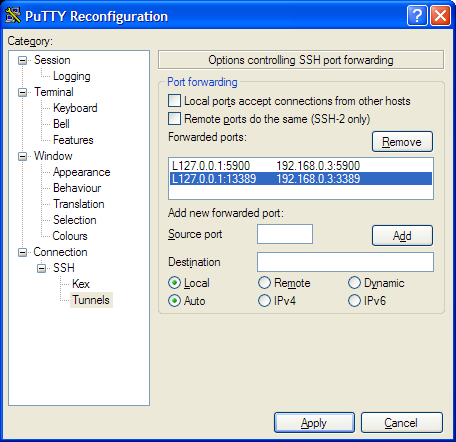
Put “127.0.0.1:13389” in the ‘local port’ box, and then the remote IP and 3389 in the remote port, then click ‘Add’. The window should update to look similar to the one above — in my example the selected line is the one you’re looking for — I’m tunnelling local port 13389 to the remote port 192.168.0.3:3389. (You can also see I’m still tunnelling port 5900 to the remote end; this is VNC’s port number, which I still use from time to time too.)
Save your settings, and hit OK — you should now have a local port 13389 tunnelling over to the remote host! Yay!
To test that all’s working, bring up a command box (quickest way is windows-key R then type ‘cmd’ — see Windows Tips for more handy tips). Type:
netstat -a | find "13389"
You should see something like:
TCP mattdesktop:13389 localhost:0 LISTENING
Don’t worry if it says something different — the important thing is there’s a ‘LISTENING’ line. If you don’t see anything at all, then make sure your SSH session is actually running, and try again.
At this point you know your SSH client is happily accepting connections on behalf of your remote computer on port 13389.
Configuring RDS
Next up, we need to convince your RDS client to connect to your remote machine via the SSH tunnel. This is a bit more complex as RDS by default only connects on port 3389. We can, however, convince it to talk to other ports with a bit of notepad hackery.
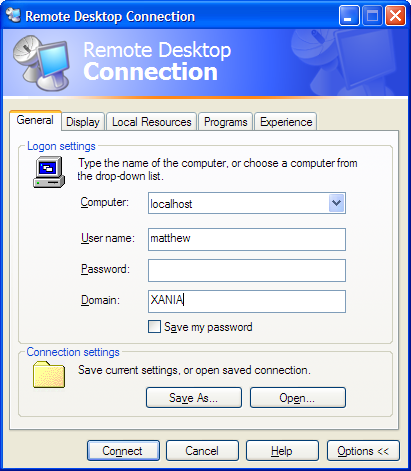
Run the RDS client (Accessories->Communications->Remote Desktop Connection), and expand the options. Set all the options as you would normally, but ensure the host name is ‘localhost’:
Now save the connection settings (remember where though!), and close the window. The settings file is a simple text file, and we need to tweak it now.
Fire up your favourite editor (I use EditPad but anything’ll do, notepad works!) and open up the settings file. Add the following line at the bottom of the file:
server port:i:13389
Now save the setting file and close your editor. As you can probably see, you’ve forced this settings file to cause the RDS client to connect on port 13389.
You should now be able to connect to your tunnelled remote desktop by double- clicking on the settings file directly!